

Mattie Stutzman's homemade lye soap
By Kevin Willias
Since Gloria's column this week touched upon homemade soap, I thought I'd share an Amish recipe for this special soap. Even if you don't try it at home, the recipe is still interesting to read.
These are instructions on how to make bars of homemade lye bar soap from Mattie Stutzman, an Amish homemaker in Sinking Spring, Ohio It's a long, involved process, but worthwhile if you can stick with it!
Cautions:
Lye is caustic until it is cured and fumes should not be inhaled. Protective gloves and
safety goggles should be worn when working with lye or lye solutions as chemical burns
can occur on the skin, mucous membranes, and even the throat and lungs. The work area
must be very well ventilated. Lye soap should be made outside, but if it is to be made
inside, a fan and open window are highly desirable.
Vinegar should be kept handy during lye soap-making to neutralize any splashes or spills
of lye, lye water, or uncured soap, which are extremely alkaline.
No copper, tin, or aluminum materials can be used for this process as a dangerous
chemical reaction can occur. Materials used to make lye soap should only be used for
making soap and should never be reused for food preparation or other uses. Items should
be clearly marked for soap-making only and kept stored safely when not in use. Anything
the lye or lye water or uncured soap touches are then caustic.
Ingredients should be measured carefully, as mistakes can cause the saponification
process to fail and the soap may be unusable.
Ingredients
1 quart water
12 ounces lye (100% sodium hydroxide), containing no dark spots, which are undesirable
heavy metals
2 ½ quarts clean lard or tallow, melted
Materials
2-quart or larger crock, Pyrex measuring cup (must be Pyrex as non-tempered glass will
break), or heavy plastic pitcher
Wooden stirring spoon or heat-resistant rubber or silicone spatula
Container to hold stirring utensils that have touched lye
2 candy thermometers
Clean a dish pan or other plastic storage container that is about 12 quarts capacity. Clear
works best so you can see if there are spots where the lye has failed to combine properly
with the fat.
Lid for the container, which does not have to be tight-fitting
Towels or blanket to keep the soap warm for a few days
Essential oil or soap-making scent, if desired
Knife to cut the soap after it has set up, before it has cured
Put 1 quart of water in the crock, Pyrex cup, or plastic pitcher. Add 12 ounces of lye and
stir gently, being careful not to cause any splashes, until the lye is dissolved.
IMPORTANT: The lye must be poured into the water, and never the other way around.
Let the lye water stand until lukewarm, 90 to 95 degrees F. Let the melted fat stand until
lukewarm or no more than 100 degrees F. These temperatures must be reached
simultaneously. If the fat is not cooling quickly enough, it can be placed in a sink of cold
or iced water. If the fat cools too much before the lye water is ready, it can be rewarmed
on the stove. Once both substances are the correct temperature, pour the lard or tallow in
the large dishpan or plastic storage container. Pour the lye water slowly into the fat while
stirring and continue stirring constantly for about 15 minutes to 1 hour. When the soap is
ready to set up, it will “trace” and the track of the spoon will stay evident in the mixture.
At this point, a few drops of essential oil or soap fragrance can be stirred in if desired.
Once the soap traces, the container should be covered and wrapped in a towel, blanket, or
even old pillows to slow the cooling process so the soap won't separate. The container
should not be disturbed for at least 24 hours. The soap can be checked about every half-
hour after the stirring has stopped to see if it is ready to be cut. To be cut, the soap should
have attained a firm, butter-like consistency. A sharp knife should be used to cut the soap
into bars. The soap is still caustic at this time, so avoid contact with skin.
All equipment should be washed immediately. The containers should be rinsed well in
warm water to remove all traces of soap, lye, and fat, and then washed in warm soapy
water.
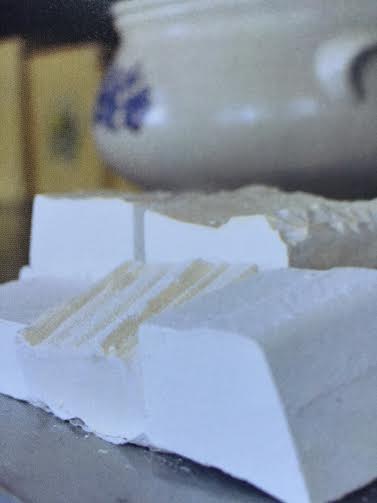
After 24 hours, look through the sides of the container. All surfaces of the soap should
appear solid. The bars should be hard and easily removed from the plastic container, but
in some cases this process may take up to 3 days. Many factors affect the length of time
the soap takes to harden. The bars are ready to be turned out of the container when they
do not accept finger indentations (use gloves to test). In a cool place on white freezer
paper, white plastic mesh, or other clean white surface, stack or space the bars with open
spaces in between to allow good airflow. The bars should be allowed 2 to 3 weeks to cure
before use. The longer the curing period, the harder the soap. If the soap is allowed to
cure for 3 to 4 weeks, the bars are safe to be wrapped in paper if desired.

Leave a Reply